User Calibration
Click on the “click” value next to the “User Calibration” field to start the user calibration. The Calibration screen will be displayed. For complete calibration of Analog Inputs start with step #2 Zero and Span Calibration.
The steps for calibration are:
-
Zero/Span the Inputs
-
Perform Cold Junction on the inputs
-
Zero/Span the Outputs

Screen 2 - Zero then Span Calibration (Inputs and Outputs).
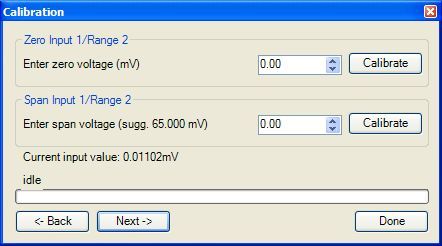
Clicking on the Next -> button will display the second screen (zero calibration) for the user calibration begin here for only calibrating the inputs terminals 27-32 (Analog Inputs). (cold junction will be completed as a final step)
In the “Zero Input 1/Range 2” section, verify that the Zero voltage that will be sourced is 0, and that the number box in the “Zero Input 1/Range 2” section shows 0.00. Click on the Calibrate button in the “Zero Input 1/Range 2” section. This will calibrate the zero range. While the input is being calibrated, the status bar will update itself with the progress.
In the “Span Input 1/Range 2” section, verify that the Span voltage that will be sourced is correct based on the suggested value or another value, and that the number box in the “Span Input 1/Range 2” section shows that value. Click on the Calibrate button in the “Span Input 1/Range 2” section. This will calibrate the span range. While the input is being calibrated, the status bar will update itself with the progress.
This process can be repeated for the next two screens – “Zero/Span Input 2/Range 0” and “Zero/Span Input 3/Range 2” – if necessary or desired.
Once the inputs have been calibrated, the user can return to screen 1 to perform the cold junction calibration.
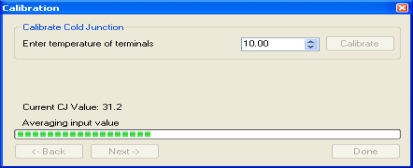
Screen 1 Cold Junction Calibration.

Using the appropriate T/C wire, measure the value of the desired input.
If adjusting the input by a preset amount for all temperature points please calibrate the cold junction by entering the current value of the selected input. Wait 120 seconds and verify with a source calibration device with the correct T/C type. In the “Calibrate Cold Junction” section, enter the temperature of the terminals and click on the Calibrate button. This will calibrate the cold junction value. Note: During a normal calibration procedure, the user should zero and span all of the inputs first and then perform a cold junction calibration, if necessary.

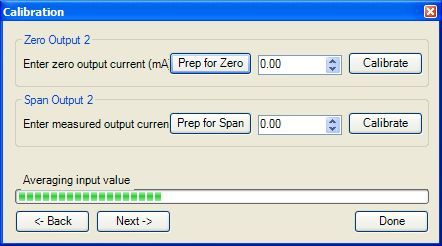
The fifth screen in the user calibration will start calibrating the outputs.
To calibrate the zero/span range for output 1, you must first attach your measuring device, then click on the Prep for Zero button. Let the unit output what it has set for the zero measurement, then enter what you are measuring coming out of the terminals in the input box for “Zero Output 1”. Note: The status bar will stop at “Averaging input value” and wait for user input before continuing – it will not finish. Once entered click on the Calibrate button and let the procedure finish. While the output is being calibrated, the status bar will update itself with the progress. Click on the Prep for Span button. Let the unit output what it has set for the span measurement, then enter what you are measuring coming out of the terminals in the input box for “Span Output 1”. Note: The status bar will stop at “Averaging input value” and wait for user input before continuing – it will not finish Once entered click on the Calibrate button and let the procedure finish. While the output is being calibrated, the status bar will update itself with the progress.
This process can be repeated for the next screen – “Zero/Span Output 2” – if necessary or desired.